Best Marvel STL Files for HueForge: Symbiotes, Avengers & Iconic Items
The Marvel STL files actually worth printing as HueForge filament paintings — Venom, Hulk, Wolverine, Mjolnir, Cap's shield, Groot, and the Infinity Gauntlet, each with the position the catalog takes on it.
Quick Answer
The strongest Marvel STL files for HueForge live in seven pockets of the catalog: Venom, Hulk, Wolverine, Thor's hammer Mjolnir, Captain America's shield, Groot, and the Infinity Gauntlet. The picks below favor models with strong silhouette, deliberate use of translucency where the source character earns it, and color counts that match a typical AMS palette.
Marvel is a strange catalog to curate. Almost every superhero has been 3D-printed a thousand times, but the prints that actually translate well to HueForge filament painting are a much narrower set — characters and props whose source designs already do the silhouette work, the tonal-contrast work, or the translucency-and-glow work that filament painting does best. The picks below skip the busts and the action poses that look great as resin figurines but fall flat as flat-relief wall art, and concentrate on what actually works in this medium.
Nothing here is for sale; this is a discovery list, not a shop. Each model card below links to the source page on MakerWorld, Patreon, Cults3D, or wherever the designer originally published it. From there you download the file and print it yourself on your AMS or multi-material setup. HuePick is a discovery catalog — the printing happens on your machine.
On the file format: most of these models ship as .3mf files with the HueForge layer plan baked in; a few are .hfp project files or bare STL geometry that you'll layer-plan yourself in HueForge before slicing. We use "STL files" throughout as the maker-search shorthand the way most printers do — the actual format is listed on each model's source page.
If HueForge is the unfamiliar piece of the workflow rather than 3D printing in general, the HueForge Printing for Beginners walkthrough covers what changes about the slicer setup and how layer plans get baked into the file. Already comfortable? Keep reading.
Sections below are ordered by maker search volume — Venom and Hulk effectively tied at the top, with Wolverine close behind. The Infinity Gauntlet sits at the bottom of the list by demand, but it's also the section that rewards the largest filament palette, so don't skip it on principle.
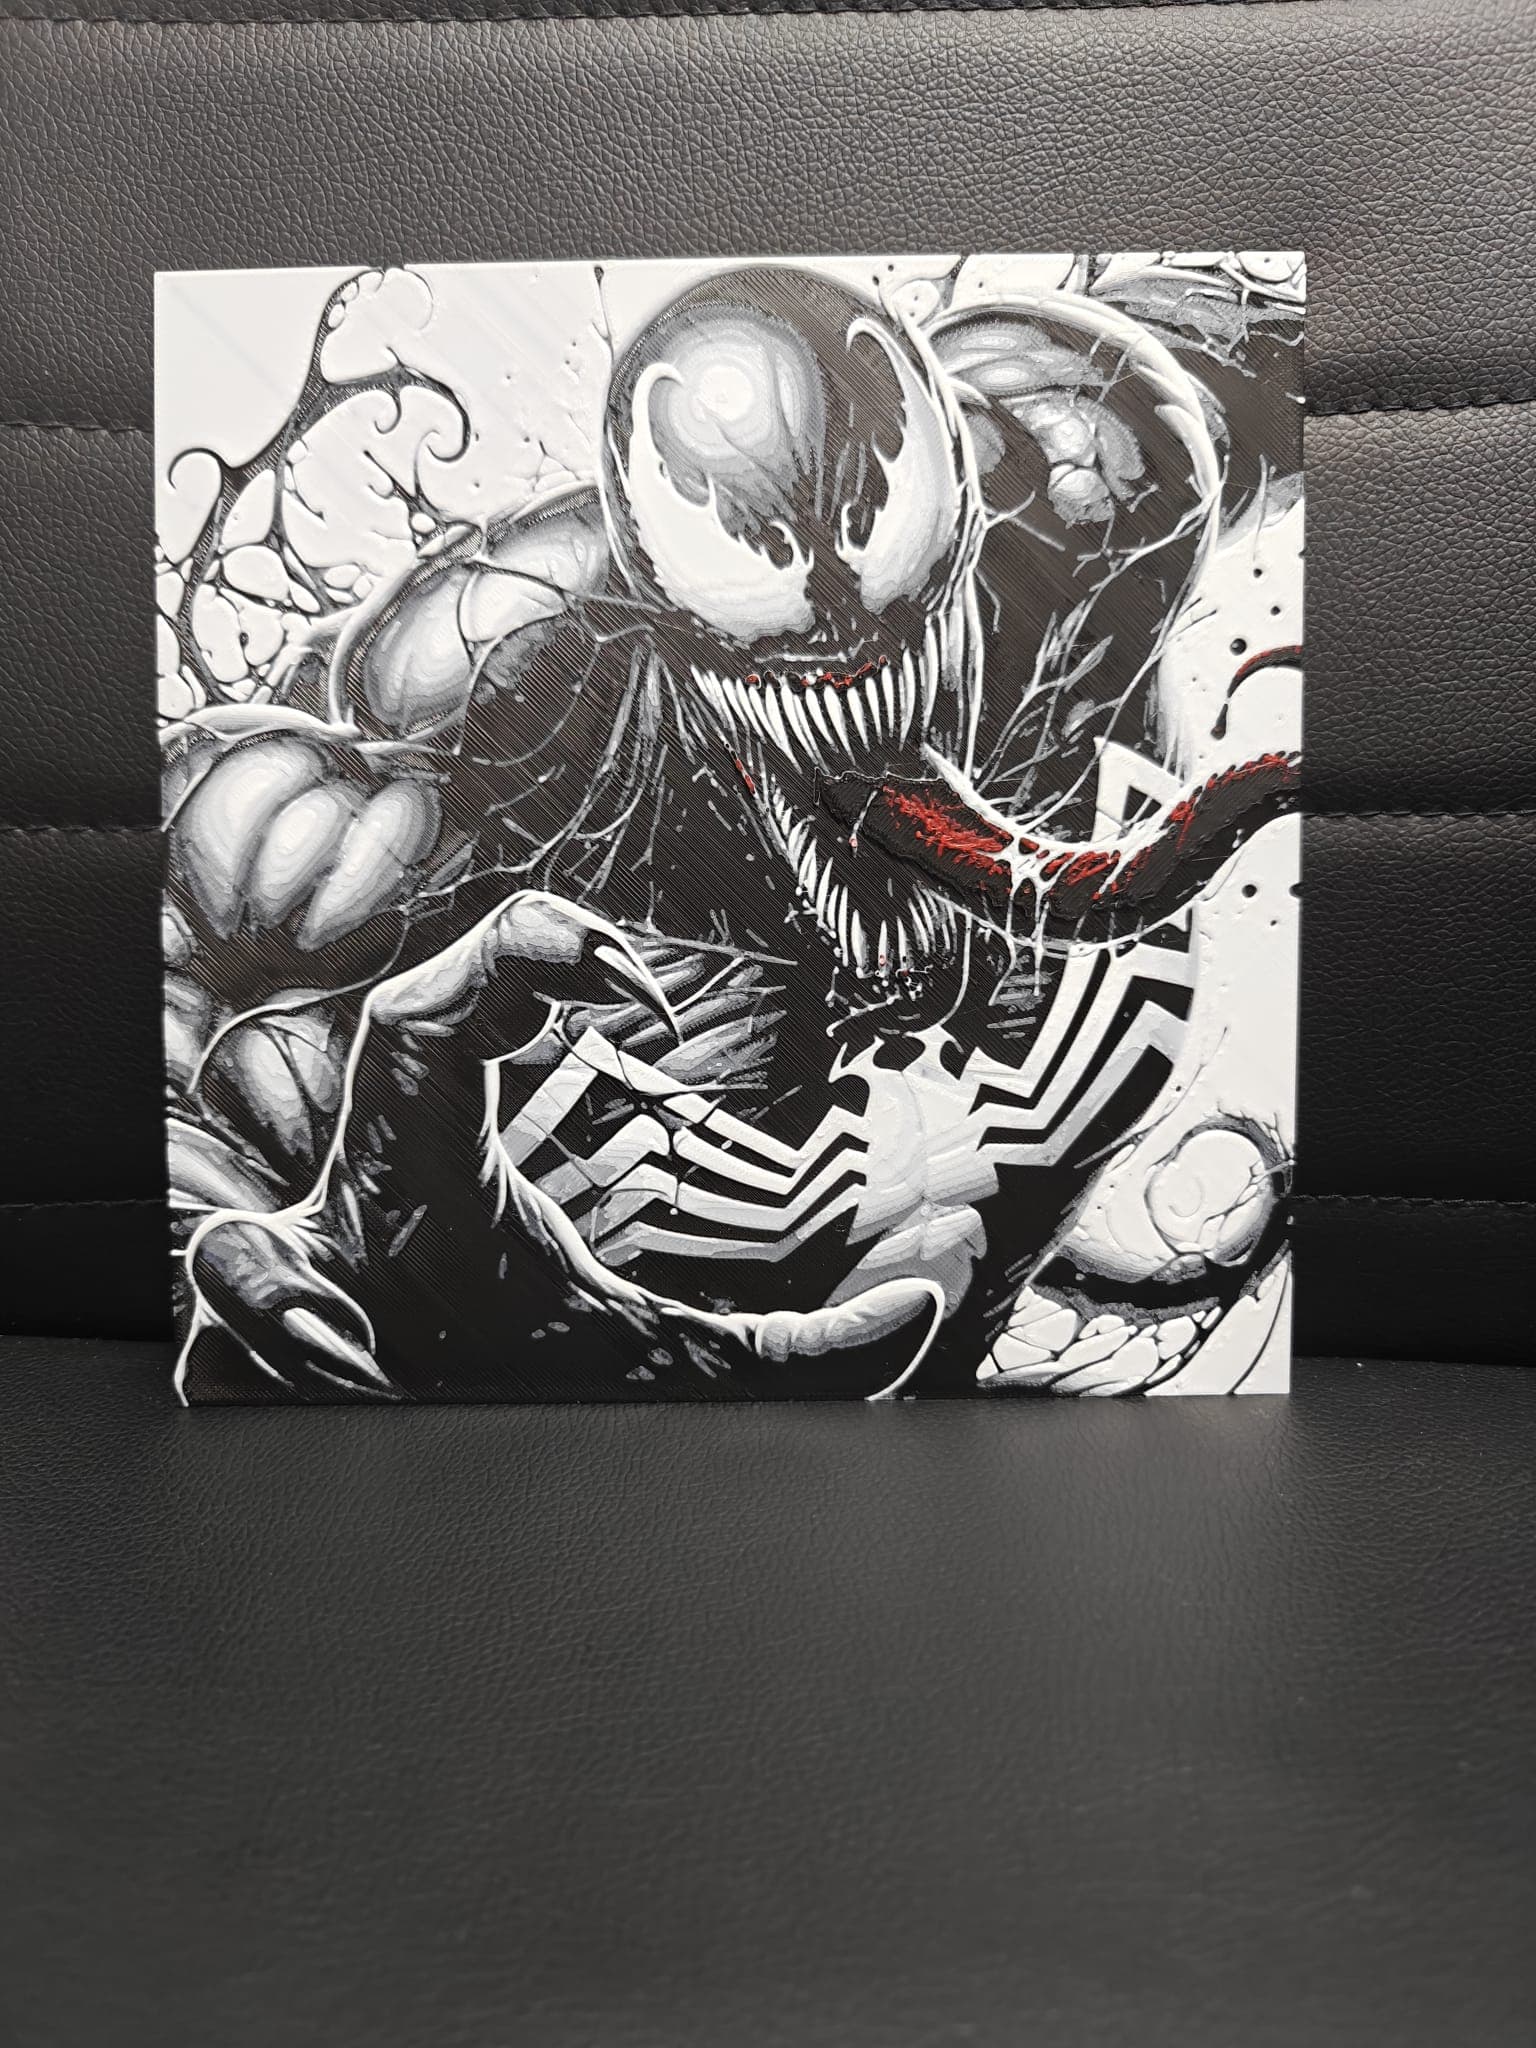
Venom
Venom is the Marvel character HueForge was practically built for. The black-symbiote-with-white-veins design is the canonical filament-painting silhouette — high contrast, deep blacks, sharp tendrils against a pale base, and a tongue-and-teeth composition that produces that unmistakable HueForge translucent-glow look when you put a backlight behind it. The strongest Venom prints in the catalog are the close-cropped face shots, and several of those are layer-planned to within a fraction of a tenth of a millimeter.
The position to take on Venom is that it's actually a tonal-value problem disguised as a hue problem. "Black and white" sounds like an easy palette, but if your white filament has too high a transmission distance — most cheap PLA whites do — the bright veins won't pop the way they should. Plan for one tightly opaque white (TD around 0.6–0.8mm) layered against a deep matte black, not the other way around. The teeth and tongue can be a third filament if you want the punch, or omitted on simpler picks.
If you only have an opaque-leaning white in your filament shelf, several of the picks below are designed for that constraint and lean toward dark-on-dark composition rather than bright-on-dark.


Browse all Venom models in the HuePick catalog →
Hulk
Hulk looks easier than he is. The character reads as high-contrast — green skin, purple pants, dramatic pose — but green and purple are both mid-tonal-value colors when you measure them properly, which means a Hulk print can wash out into a single muddy mid-gray under the wrong light if the filaments aren't separated by tonal value. The picks below skew toward designers who've solved this with deliberate dark-greens-against-light-pants palettes, or by adding a pure-black outline filament that pulls the silhouette forward.
The position worth taking is that Hulk benefits from rage-pose compositions over standing portraits. The body language is the silhouette, and a calm-Hulk bust loses that. Almost every front-row pick below is mid-roar with the body squared at the viewer.
If you're working with a four-color palette, Hulk is probably the wrong starting Marvel print — the tonal-contrast problem above gets harder with fewer filaments, not easier. Wolverine or Captain America's shield are friendlier first prints.


Browse all Hulk models in the HuePick catalog →
Wolverine
Wolverine is a silhouette character — claws extended, mask peaked, costume yellows reading bright against blacks and skin. The strongest Wolverine prints in the catalog commit hard to that pose and don't try to add a background scene. Where they go wrong is when the yellow filament is chosen for hue accuracy rather than tonal value: a faithful-yellow that's too transparent will read as orange-brown over the underlying layers, and the costume goes muddy.
The position to take is that yellow is the hardest filament call on a Wolverine print and worth obsessing over. A bright, opaque, slightly-cool yellow beats a "screen-accurate" warm yellow every time on a HueForge piece, because the tonal value is what survives the layered translation. Several of the picks below come with explicit filament recommendations baked into the source page.
If you want a Wolverine print but only have a more limited yellow option, the back-row picks below skew toward the X-Men #1 cover-art style with simplified two- or three-color palettes that sidestep the issue.


Browse all Wolverine models in the HuePick catalog →
Thor's Hammer (Mjolnir)
Mjolnir is the strongest single-object pick in the entire Marvel catalog because the design carries itself. A short-handled hammer with engraved Norse runes is iconic enough that even a four-color filament painting reads correctly from across the room, and the rune detail rewards careful transmission-distance calibration in a way that almost no other Marvel subject does.
The position worth taking on Mjolnir is that the runes are where the print succeeds or fails. They need to be the lightest layer in the stack and they need to read distinctly against the metal of the head. Several picks below come with the rune layer pre-tuned in the layer plan; others are bare STL geometry that you'll layer-plan yourself, and those reward time spent in HueForge before sending to the slicer.
If you've got a backlight setup planned, Mjolnir is one of the prints that actually changes character with light — front-lit it reads as a hammer, back-lit it reads as runes glowing through metal. Worth the shadow-box build for that pick alone.


Browse all Mjolnir models in the HuePick catalog →
Captain America's Shield
Cap's shield is geometry. A circular composition with concentric rings and a centered star — there's almost no decision to make about silhouette because the design has already made it. That's the appeal and also the trap: a poorly-tuned shield print looks like a coaster, and the difference between "iconic" and "coaster" is entirely in the layer plan.
The position to take is that the chrome look almost never works in PLA-based filament painting and the catalog reflects this. The strongest shield picks below are the stylized comic-art versions — flatter color, harder edges, a more graphic palette — rather than the photoreal renders that try to mimic metallic gloss. Filament painting is not a metallic-finish medium and pretending otherwise is the most common Cap-shield mistake on the catalog.
If you only have four colors, this is honestly the easiest Marvel print on the page. Red, white, blue, and a deep navy outline is enough.


Browse all Captain America shield models in the HuePick catalog →
Groot
Groot is the Marvel character whose source design is closest to what HueForge was already doing — a layered, textural, woody, branch-pattern surface with bioluminescent moments of green where the leaves and seedlings sit against the bark. The translucency layering filament painting does naturally is exactly what a Groot print needs, and the catalog has several picks that are clearly designed by makers who saw this and ran with it.
The position to take on Groot is that low contrast is the failure mode. Wood-tone-on-wood-tone is how most of these go wrong — the catalog has a few Groots where the body and the leaves are within a half-step tonal value of each other, and from any distance the print loses its read. The strongest picks below have a clear bright-green leaf or seedling layer that breaks the brown monotony.
Baby Groot specifically deserves a shoutout: the catalog's chibi-style Baby Groot prints are some of the best entry-level HueForge picks across the entire Marvel section, because the silhouette is so simple that even a three-color print succeeds.


Browse all Groot models in the HuePick catalog →
The Infinity Gauntlet
The Infinity Gauntlet is the Marvel print to push your color count on. The six stones — orange Soul, green Time, red Reality, purple Power, blue Space, yellow Mind — are an explicit invitation to use six distinct filaments in a single print, and the picks below take that invitation seriously. This is the page where the gauntlet earns the largest filament palette you've got.
The position worth taking is that gem translucency matters more than gold-glove accuracy. The metal of the gauntlet itself can be a single mid-tonal-value gold or bronze without losing the read; the stones are where the print succeeds or fails. Each stone wants to read as the most luminous element in its quadrant of the composition, which means either lower-TD (more transparent) filaments at the stone positions, or a layer plan that explicitly thins the metal underneath the stones to let backlight through.
If you're not planning to backlight, the picks at the back of the section below are flatter-palette interpretations that still read as a recognizable gauntlet under normal room light. The front-row picks are the ones that pay off the backlight build.


Browse all Infinity Gauntlet models in the HuePick catalog →
After the print
Once you've found a model from the sections above, the rest of the workflow is what makes the print actually land on the wall. Color choice is doing more work on Marvel prints than on most other catalog subjects because the source characters have such established palettes — Venom in the wrong black, Hulk in the wrong green, Cap's shield in a too-orange red, all of those read as wrong before the viewer can articulate why. The Choosing Filament Colors for HueForge guide walks through how to build a palette around a specific character's actual color logic rather than picking colors at random.
Display matters too. Venom, Mjolnir, and the Infinity Gauntlet are the three sections on this page that change character meaningfully with backlighting — front-lit they read as paintings, back-lit they read as the source character at full effect. The How to Display 3D Printed Art at Home post covers the cheap shadow-box rigs that make this happen without committing to a custom build.
If you'd rather start from a different corner of the catalog, a few sibling roundups use the same H2-by-sub-entity structure pointed at different fandoms:
- Best Star Wars STL Files — Mandalorian helmets, lightsabers, the Falcon, Death Star
- Best Fantasy STL Files — dragons, knights, wizards, castles
- Best Pokemon STL Files — Pokeballs, Gengar, Snorlax, Legendaries
And if you want to skip the curation, the Marvel section of the catalog surfaces every model in the bucket — the seven sub-entities above plus the long tail of supporting characters, alternate-universe variants, and crossover compositions. Marvel sits in a more competitive corner of the maker-search market than most of our other roundups, so the catalog is doing some real work to surface the best picks; lean on it if the curation here doesn't quite match your taste.
Pick one print, build the palette around the source character's actual color logic — not Hollywood-color-grading approximations of it — and put it somewhere with a light source behind it if the section recommended one. That's the whole loop.


")